Nginx (engine x) is a high performance lightweight HTTP server, more and more sites are using nginx, according to Netcraft survey (http://news.netcraft.com/archives/2013/11/01/november-2013-web-server-survey.html), nginx powers 15% of the busies sites in November 2013.
Nginx installation is very straight forward, we can download latest source code from http://nginx.org/en/download.html or point our yum source to http://nginx.org/packages/OS/OSRELEASE/$basearch/ and install using yum.
Replace “OS” with “rhel” or “centos”, depending on the distribution used, and “OSRELEASE” with “5” or “6”, for 5.x or 6.x versions, respectively.
So for CentOS 6.3, we can point our YUM source to: http://nginx.org/packages/centos/6/$basearch/
Showing posts with label Apache. Show all posts
Showing posts with label Apache. Show all posts
Thursday, 21 November 2013

Friday, 11 October 2013
use HAProxy as HTTP load balancer
HAProxy can provide high availability, load balancing, and proxying for TCP and HTTP based application.
In my lab setup of HAProxy, I have 3 servers
centos-1, running apache
centos-2, running apache
centos, running HAProxy, HTTP requests to it will be forwarded to the other 2 servers
Here are my steps of setting up HAProxy to load balance between to HTTP servers.
1. on centos-1 and centos-2: install apache
2. on centos, download HAProxy, the latest stable version is 1.4.24
3. edit haproxy configuration file, my sample haproxy.cfg, note this is for testing only, for complete configuration options, refer to http://cbonte.github.io/haproxy-dconv/configuration-1.4.html
4. start HAProxy
5. launch web browser, visit http://192.168.100.100, you will see the page displaying "centos-1", this shows our request is being served by centos-1
refresh the page again, page will display "centos-2", our request is being served by centos-2 this time.
If we change balance roundrobin to balance source, our request will always being served by the same host, but using sticky session is still the preferred way to make sure clients always connect to the same backend server.
The setup is done, but it needs more tweaks before it can be used in production environment.things to check:
1. check backend server aliveness.
2. sticky session.
3. we need to change apache LogFormat on centos-1 centos-2 to reflect the real HTTP client address.
In our setup centos is the only server running HAProxy, it will be a single point of failure, we can setup centos cluster, and make HAProxy listening on the VIP.
reference:
http://haproxy.1wt.eu/
http://cbonte.github.io/haproxy-dconv/configuration-1.4.html
In my lab setup of HAProxy, I have 3 servers
centos-1, running apache
centos-2, running apache
centos, running HAProxy, HTTP requests to it will be forwarded to the other 2 servers
Here are my steps of setting up HAProxy to load balance between to HTTP servers.
1. on centos-1 and centos-2: install apache
# yum -y install httpdcreate index.html for apache
# hostname -s > /var/www/html/index.htmldisable iptables, start apache
# service iptables stop
# service httpd start
2. on centos, download HAProxy, the latest stable version is 1.4.24
# ./haproxy -v
HA-Proxy version 1.4.24 2013/06/17
Copyright 2000-2013 Willy Tarreau <w@1wt.eu>
3. edit haproxy configuration file, my sample haproxy.cfg, note this is for testing only, for complete configuration options, refer to http://cbonte.github.io/haproxy-dconv/configuration-1.4.html
global
daemon
maxconn 256
defaults
mode http
timeout connect 5000ms
timeout client 50000ms
timeout server 50000ms
frontend http-in
bind *:80
default_backend servers
backend servers
balance roundrobin
server server1 centos-1:80 maxconn 32
server server2 centos-2:80 maxconn 32
4. start HAProxy
# ./haproxy -f haproxy.cfg
5. launch web browser, visit http://192.168.100.100, you will see the page displaying "centos-1", this shows our request is being served by centos-1
refresh the page again, page will display "centos-2", our request is being served by centos-2 this time.
If we change balance roundrobin to balance source, our request will always being served by the same host, but using sticky session is still the preferred way to make sure clients always connect to the same backend server.
The setup is done, but it needs more tweaks before it can be used in production environment.things to check:
1. check backend server aliveness.
2. sticky session.
3. we need to change apache LogFormat on centos-1 centos-2 to reflect the real HTTP client address.
In our setup centos is the only server running HAProxy, it will be a single point of failure, we can setup centos cluster, and make HAProxy listening on the VIP.
reference:
http://haproxy.1wt.eu/
http://cbonte.github.io/haproxy-dconv/configuration-1.4.html
Tuesday, 10 September 2013
How to install Zabbix server on Linux server
Zabbix is an open source monitoring server, besides monitoring the service status, it also stores the historical status of service, so we can generate graphs easily from Zabbix. I have been using Nagios for many years, recently I decided to give Zabbix a try.
Here are the steps I installed server.
First we need to download zabbix software, current stable version is 2.0.8, so I downloaded zabbix-2.0.8.tar.gz
1. create OS account for running zabbix server
Before Installing zabbix, we need to configure the database properly.
Follow instructions on this link to setup the database https://www.zabbix.com/documentation/2.0/manual/appendix/install/db_scripts
For MySQL:
4.
5. start zabbix server
6. Install zabbix web interface:
7. Installing zabbix frontend
Open browser, go to http://localhost/zabbix, follow the instructions for frontend installation wizard to complete the installation.
8. After Installing, you will be able to login zabbix system, the default login ID is Admin, password is zabbix.
Next we need to install zabbix agent on remote hosts and zabbix server to monitor remote hosts.
Reference: https://www.zabbix.com/documentation/2.0/manual/installation/install#from_the_sources
Here are the steps I installed server.
First we need to download zabbix software, current stable version is 2.0.8, so I downloaded zabbix-2.0.8.tar.gz
1. create OS account for running zabbix server
# useradd zabbix2.
# tar -zxpf zabbix-2.0.8.tar.gz3. Zabbix uses databases as its data storage, it supports MySQL, PostgreSQL, Oracle, DB2 and SQLite. In my setup I use MySQL.
# cd zabbix-2.0.8
Before Installing zabbix, we need to configure the database properly.
Follow instructions on this link to setup the database https://www.zabbix.com/documentation/2.0/manual/appendix/install/db_scripts
For MySQL:
mysql> create database zabbix character set utf8 collate utf8_bin;
mysql> grant all privilegs on zabbix.* to 'zabbix'@'localhost' identified by 'zabbix';
mysql> exit;
# mysql -uzabbix -pzabbix zabbix < database/mysql/schema.sql
# mysql -uzabbix -pzabbix zabbix < database/mysql/images.sql
# mysql -uzabbix -pzabbix zabbix < database/mysql/data.sql
4.
# ./configure --enable-server --with-mysql --with-net-snmp \
--with-libcurl --prefix=/usr/local/zabbix
# make install
5. start zabbix server
# /usr/local/zabbix/sbin/zabbix_server
6. Install zabbix web interface:
# mkdir /var/www/html/zabbix/
# cp -pr frontends/php/* /var/www/html/zabbix/
7. Installing zabbix frontend
Open browser, go to http://localhost/zabbix, follow the instructions for frontend installation wizard to complete the installation.
8. After Installing, you will be able to login zabbix system, the default login ID is Admin, password is zabbix.
Next we need to install zabbix agent on remote hosts and zabbix server to monitor remote hosts.
Reference: https://www.zabbix.com/documentation/2.0/manual/installation/install#from_the_sources
Monday, 2 September 2013
Setting up Nagios monitoring server
Nagios is an open-source monitoring software, you can monitor different host resources like host UP/down status, disk usage, system load, logfile.
Setting up Nagios on Linux is very straight forward.
In our test environment, we will setup host centos as our monitoring host.
Steps to install Nagios on centos:
1. Download nagios core, nagios plugins
http://www.nagios.org/download/core, choose DIY option.
http://www.nagios.org/download/plugins, download latest stable version.
2. Create nagios account:
3. Install Nagios
4. Create nagiosadmin account, this account will be used to login to nagios web interface
5. Edit /etc/httpd/conf.d/nagios.conf, pointing AuthUserFile to /usr/local/nagios/etc/htpasswd.users
6. Start apache
7. Install Nagios Plugins
8. Enable autostart of Nagios and start Nagios service
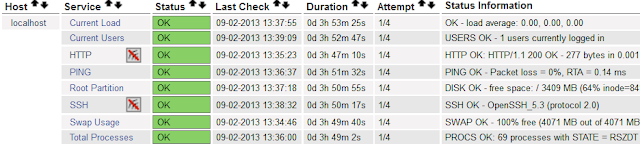
In the next post http://linuxscripter.blogspot.com/2013/09/using-nagios-and-nrpe-to-monitor-remote.html, I will discuss how to monitor remote hosts using Nagios and NRPE.
Reference: http://nagios.sourceforge.net/docs/3_0/quickstart-fedora.html
Setting up Nagios on Linux is very straight forward.
In our test environment, we will setup host centos as our monitoring host.
Steps to install Nagios on centos:
1. Download nagios core, nagios plugins
http://www.nagios.org/download/core, choose DIY option.
http://www.nagios.org/download/plugins, download latest stable version.
2. Create nagios account:
# useradd nagios
# passwd nagios
# groupadd nagcmd
# usermod -a -G nagcmd nagios
# usermod -a -G nagcmd apache
3. Install Nagios
# tar -zxpf nagios-3.5.0.tar.gz
# cd nagios
# ./configure --with-command-group=nagcmd
# make all
# make install
# make install-init
# make install-config
# make install-commandmode
# make install-webconf
4. Create nagiosadmin account, this account will be used to login to nagios web interface
# htpasswd -c /usr/local/nagios/etc/htpasswd.users \
nagiosadmin
5. Edit /etc/httpd/conf.d/nagios.conf, pointing AuthUserFile to /usr/local/nagios/etc/htpasswd.users
6. Start apache
# service httpd restart
7. Install Nagios Plugins
# tar -zxpf nagios-plugins-1.4.16.tar.gz
# cd nagios-plugins-1.4.16
# ./configure --with-nagios-user=nagios \
--with-nagios-group=nagios
# make; make install
8. Enable autostart of Nagios and start Nagios service
# chkconfig --add nagios9. Login to http://centos/nagios, you will see we already have centos monitored by Nagios
# chkconfig nagios on
# service nagios start

In the next post http://linuxscripter.blogspot.com/2013/09/using-nagios-and-nrpe-to-monitor-remote.html, I will discuss how to monitor remote hosts using Nagios and NRPE.
Reference: http://nagios.sourceforge.net/docs/3_0/quickstart-fedora.html
Tuesday, 8 May 2012
Use telnet to test HTTP server
A few year ago, I managed a few hundred of servers, they provide HTTP service using Apache.
I often need to test the HTTP service on these servers.
I often need to test the HTTP service on these servers.
I used telnet for my testing
C:\>telnet www.redhat.com 80
GET /robots.txt HTTP/1.1
host: www.redhat.comHTTP/1.1 200 OK
Server: Apache
X-Powered-By: Servlet 2.5; JBoss-5.0/JBossWeb-2.1
Last-Modified: Fri, 27 Jan 2012 23:35:31 GMT
Accept-Ranges: bytes
Content-Length: 484
Content-Type: text/plain; charset=UTF-8
Cache-Control: no-cache
Date: Tue, 08 May 2012 12:20:11 GMT
Connection: keep-alive
User-agent: *Disallow: /apps/download/results.html Disallow: /apps/search/results.html Disallow: /apps/user/ Disallow: /apps/user/* Disallow: /WebX/* Disallow: /webx/* Disallow: /WebX/* Disallow: /test_community/ Disallow: /test_community/* Disallow: /network Disallow: /archives/redhat-install-list/2000-September/msg00588.html Disallow: /search Disallow: /search* Disallow: /mailman/listinfo/ceylon-core Disallow: /mailman/private/ceylon-core/ Disallow: /mailman/admin/ceylon-core
Friday, 6 April 2012
Use Apache RewriteRule for SEO
There are often cases some web pages need to be moved to a different location.
Let's say we have a page http://linuxscripter.blogspot.com/foodrecipes.html
After maintaining the page for years, I decide to re-organize the website structure, put everything related to food in one directory. But over the years, the original page may have been booked marked by hundreds of visitors, and have been cached by many search engines. When someone access the original page either through bookmark or search engine, we need to inform him that the pages have been moved to new locations.
To do this, there are a few ways:
1. Create a hyperlink in the original page, connecting to the new page.
This way requires visitor to click the link to view the new page, apparently, it's not a good idea.
2. Auto redirect the page to new location using javascript.
3. Auto redirect the page to new location using HTML meta tag.
Both 2 and 3 can redirect the page to new location, but they are using 302 redirect, it's not SEO friendly. To avoid affecting the search engine visibility, it's better to use 301 redirect. For static pages served by Apache, we can use RewriteRule to achieve this.
4. Auto redirect using Apache RewriteRule
In this way, it tells search engine that foodrecipes.html has been moved to /food/recipes.html permanently, search engine will not treat /food/recipes.html as new page.
Let's say we have a page http://linuxscripter.blogspot.com/foodrecipes.html
After maintaining the page for years, I decide to re-organize the website structure, put everything related to food in one directory. But over the years, the original page may have been booked marked by hundreds of visitors, and have been cached by many search engines. When someone access the original page either through bookmark or search engine, we need to inform him that the pages have been moved to new locations.
To do this, there are a few ways:
1. Create a hyperlink in the original page, connecting to the new page.
<a href=/food/recipes.html>recipes at new location</a>
This way requires visitor to click the link to view the new page, apparently, it's not a good idea.
2. Auto redirect the page to new location using javascript.
<script type="text/javascript">
<!--
window.location="http://linuxscripter.blogspot.com/food/recipes.html"
//-->
</script>
<head>
<meta
HTTP-EQUIV="REFRESH" content="0;
url=http://linuxscripter.blogspot.com/food/recipes.html" />
</head>
Both 2 and 3 can redirect the page to new location, but they are using 302 redirect, it's not SEO friendly. To avoid affecting the search engine visibility, it's better to use 301 redirect. For static pages served by Apache, we can use RewriteRule to achieve this.
4. Auto redirect using Apache RewriteRule
RewriteEngine On
RewriteRule ^/food_recipes\.html$ /food/recipes.html [R=301,L]
In this way, it tells search engine that foodrecipes.html has been moved to /food/recipes.html permanently, search engine will not treat /food/recipes.html as new page.
Subscribe to:
Posts (Atom)